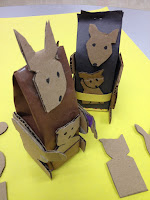
Materials – single serve
milk carton, grocery brown paper bag, cardboard, black Sharpie marker, Elmer’s
glue, scissors, tape.
Step 1 – Clean and rinse
milk carton.
Step 2 – Cut brown paper shopping bag (remembering to cut a slit for the kangaroo pocket). Wrap and glue brown paper to carton wraping carton with extra room at top. Tape paper together at top.
Step 3 – Cut legs, arms, baby kangaroo (joey) out of cardboard. (Can be made from discarded boxes often available in local grocery stores).
Step 4 – Use Sharpie pen to add features (eyes, nose and, if desired, paws) to cardboard pieces.
Step 5 – Glue face, feet and arms to carton (bend arms to give lifelike embrace look). Insert Joey in pocket. (Glue in pace if desired.) Paste brown paper to bottom of carton with brown paper tail showing in back.
Step 6 – Allow time for glue to dry so kangaroo is secure.
NOTE: You can scale to
larger size by following the same steps (substituting a square cardboard box
and brown kraft paper) to create Kangaroo that is closer to life size.


No comments:
Post a Comment